|
|
 |
|
|
|
|
|
|
|
- Van Capelle Construction
- General Contractor
- Room Additions
- Remodeling
- Kitchens
- Baths
- Architectural Plans
- Foundation
- Framing
- Electrical
- Plumbing
- HVAC
- Roofing
- Stucco
- Drywall
- Doors
- Windows
- Finish Carpentry
- Tile
- Granite
|
|
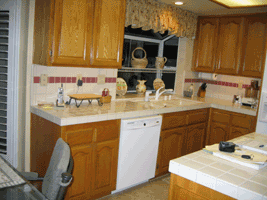
| Here we have a kitchen that we are going to remove all the cabinets, countertops and raise the ceiling to match the ceiling in the family room. We will be adding recessed can lights in the process.
Ready to eat out? |
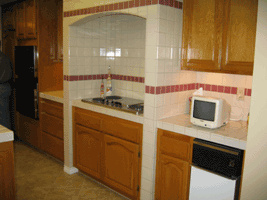
The oven at the far left is going to be relocated to where the refridgerator is and the fridge will move to the right of the cooktop where the small television is.
| |
|
|
This was the area of the bar. They decided to remove the bar peninsula to open up the area between the kitchen and the family room. You will also notice the lowered ceiling in the kitchen will be removed.
|
|
|
Demolition.
What a mess!!
|
|
|
The area of the bar was removed which created a large open area between the family room and the kitchen.
|
|
|
Now it's time to rewire the kitchen. Notice all the wires that were between the floor and soffit.
|
|
|
After all the plumbing and electrical is installed in their proper locations, as per the new kitchen layout which we received from our custom cabinet maker, we hang our new drywall.
|
|
|
After the drywall is hung the taping and mudding process begins.
Wow, I should be getting my kitchen back soon!
|
|
|
During the kitchen remodel our homeowner decided to add recessed can lights in the ceiling of the family room and redo the fireplace in stone to match with the kitchen. We drywalled the top half of the fireplace for the new plasma television complete with wiring for surround sound.
|
|
|
After the drywall is completed and the walls are painted the cabinets are delivered and ready to install. You will also note that our cabinets are already stained and finished before they are delivered. We stain and finish our cabinets in a controlled dust free environment, a spray booth, unlike some other cabinet makers who like to spray on site in an uncontrolled environment.
|
|
|
Cabinets are being installed, which takes approximately 2 days.
|
|
|
Cabinets boxes are installed and the next step is to set the doors, drawers and all the pull out trays and goodies.
|
|
|
The cabinet installation was completed on the second day, with the plywood (rough top) in place the granite is ready to be measured for fabrication.
|
|
|
Here we have reached the end. The granite is installed and the travertine backsplash is finished. The stainless steel appliances are installed, sink and dishwasher are up and running and this kitchen is ready for some, "good home cooking." Notice the black dots on the backsplash that accent the granite countertop.
|
|
|
This is the splash behind the cook top, it has a copper tile to bring out the copper color in the granite.
|
|
|
The remodeled fireplace has a mantle to match the kitchen cabinets and travertine to match the back splash on the kitchen countertop. The black dots are granite to also match the kitchen countertop.
|
Thanks for viewing our Kitchen: step by step.
Happy Cooking!
|
|
|
|
|
|
|
|
|